Improve Your Shooting With the Drill Index
Put Your Shooting Skills to the Test
Basic Level
Work through all drills across multiple dry or live-fire sessions. Focus on fundamentals, safe handling, and establishing solid muscle memory.
Intermediate Level
Once muscle memory is built, choose one drill from each category and form a custom course of fire. Run the entire course cold 1–3 times. Then isolate and refine each drill before finishing with another 1–3 cold runs.
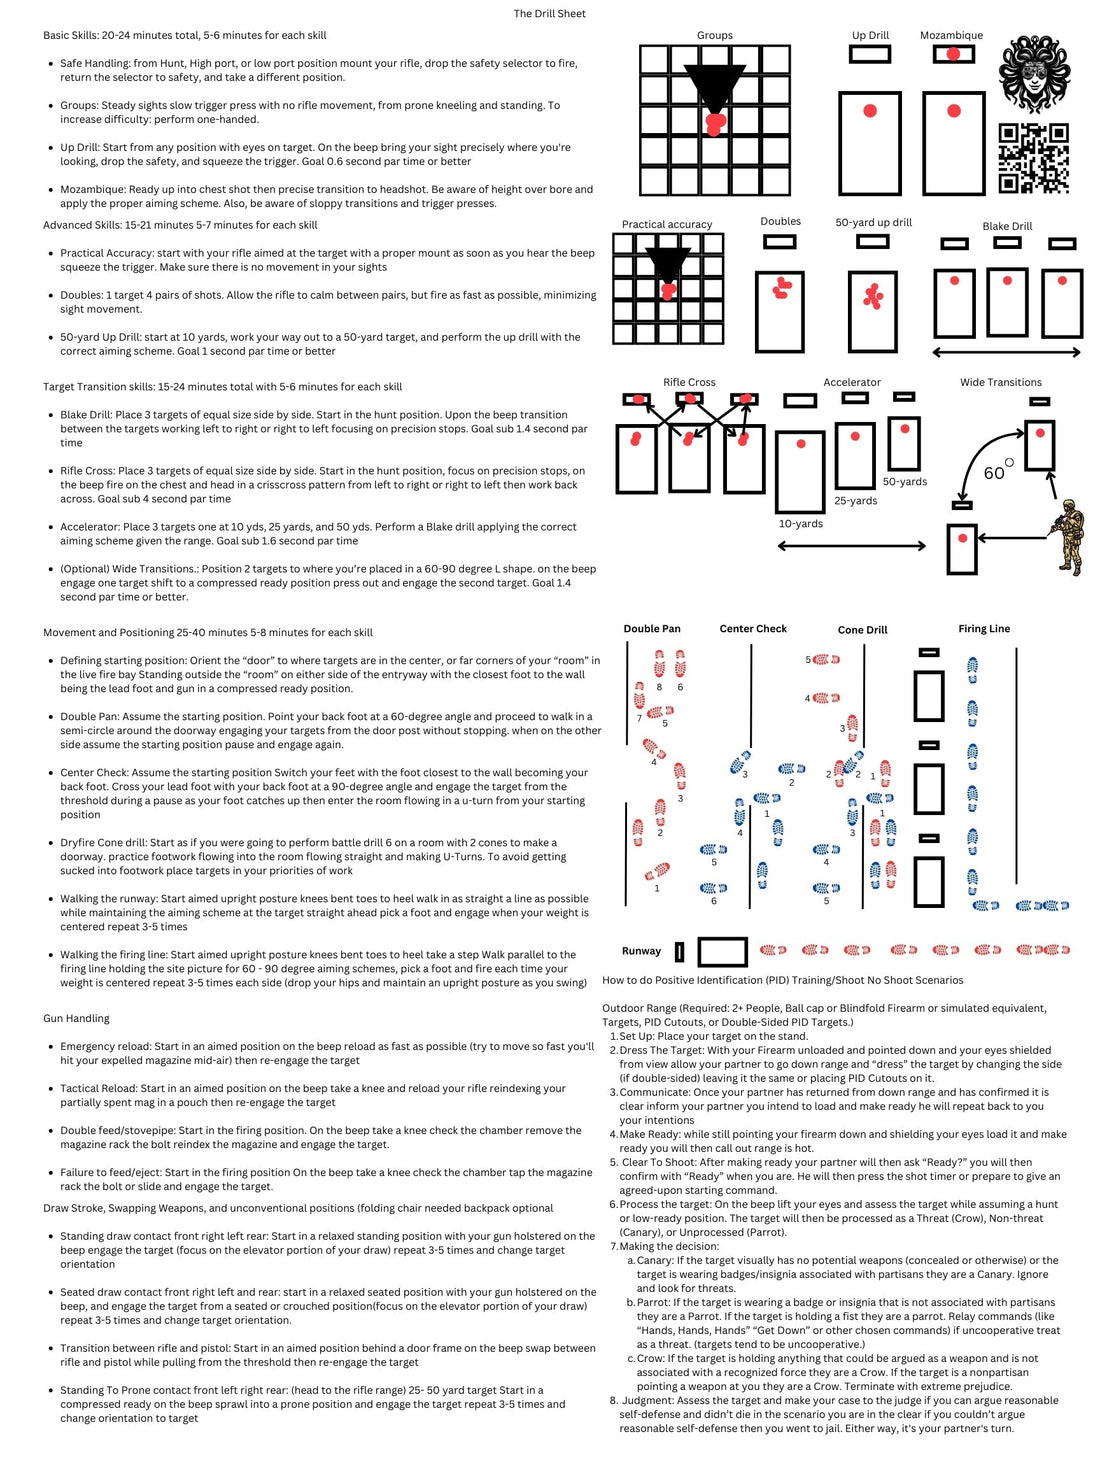
Basic Firearms Skills (20–24 Minutes Total | 5–6 Minutes Per Drill)

1. Safe Handling
From low ready, high port, or low port, mount your rifle, disengage the safety, acquire the target, re-engage safety, and take a new position. Builds consistent safety habits.
2. Group Shooting
Practice controlled trigger presses from prone, kneeling, and standing. Focus on eliminating rifle movement. Increase difficulty by shooting one-handed.
3. Up Drill
With eyes on target, bring your optic to line of sight on the beep. Drop the safety and shoot. Target par time: 0.6 seconds or better.
4. Practical Accuracy
Start from a ready position with your firearm mounted. On the beep, fire without disturbing your sight picture.
5. Slap the Trigger
Same setup as Practical Accuracy, but focus on reacting immediately to the beep with fast trigger engagement.
Advanced Firearms Drills (20–32 Minutes | 5–8 Minutes Per Drill)
1. Practical Accuracy (Advanced)
Reinforce the fundamentals with faster reaction time and tighter groups under time pressure.
2. Doubles Drill
Fire four pairs of quick, accurate shots. Allow brief recovery between pairs. Focus on managing recoil and minimizing sight disruption.
3. 50-Yard Up Drill
Progress from 10 to 50 yards using the Up Drill. Apply correct sight alignment and aiming holds. Par time: 1 second or less.
4. Mozambique Drill
Execute a chest shot followed by an accurate headshot. Understand holdovers and avoid sloppy transitions or rushed trigger pulls.
Target Transition Drills (15–24 Minutes | 5–6 Minutes Per Drill)

1. Blake Drill
Three side-by-side targets. Engage each in rapid succession with precise stopping between shots. Goal: Sub-1.4 second par time.
2. Rifle Cross
Same setup as the Blake Drill. Fire in a chest-to-head crisscross pattern across targets. Goal: Under 4 seconds.
3. Accelerator
Targets at 10, 25, and 50 yards. Apply correct holdovers and spacing. Goal: Sub-1.6 second par time.
4. Wide Transitions
Position two targets at a 60–90 degree angle. From low ready, engage both with a compressed ready between. Goal: 1.4 seconds or better.
Threshold Movement Drills (15–24 Minutes | 5–8 Minutes Per Drill)
1. Double Pan
From outside a simulated doorway, move in an arc around the doorframe, engaging targets from both sides without pausing.
2. Center Check
Cross step around the entry threshold, pause mid-transition to engage targets, then flow through in a U-pattern into the room.
3. Dry Fire Cone Drill
Use cones to simulate doorways. Practice footwork and room clearing tactics without live fire, focusing on efficient entry paths.
Movement & Positioning Drills (20–32 Minutes | 5–8 Minutes Per Drill)
1. Walking the Runway
Walk heel-to-toe in a straight line while maintaining your sight picture. Fire when weight is centered.
2. Walking the Firing Line
Move laterally while maintaining proper alignment. Engage targets with 60–90 degree angles. Repeat in both directions.
3. Competition Movement
From one side of a barricade, cross laterally to the other side and engage. Keep the weapon aimed and ready throughout.
4. 3-Step Stop
Dash into a marked position and engage the target. Emphasize stopping on the third step with a clean trigger press.
Gun Handling Drills

1. Emergency Reload
From the aimed position, reload as fast as possible and re-engage. Bonus: Try catching the ejected mag mid-air.
2. Tactical Reload
Take a knee, retain your partially used mag, reload, and re-engage.
3. Double Feed/Stovepipe
Diagnose the malfunction, clear the chamber, reindex your mag, and get back on target.
4. Failure to Feed/Eject
Tap-rack-bang drill: Clear the malfunction and resume fire.
Weapon Transitions & Unconventional Positions
1. Standing Draw (Contact Front, Side, Rear)
Draw from a relaxed stance and engage from all directions. Focus on minimizing unnecessary upper body movement.
2. Seated Draw (All Angles)
Draw from a seated or crouched position. Train engagement under non-ideal conditions.
3. Rifle to Pistol Transition
Swap between rifle and pistol behind cover or while moving. Practice retaining control and smooth transitions.
4. Standing to Prone (All Angles)
Drop to prone quickly and fire on targets 25–50 yards away. Train for dynamic directional engagement.
Positive Identification (PID) & Shoot/No-Shoot Scenarios
Required Setup:
- Outdoor range
- At least 2 people
- Targets and PID cutouts
- Firearms or training equivalents
- Ball cap (for eye coverage during setup)
Step-by-Step PID Training
- Target Setup: One partner dresses the target (with or without PID cutouts).
- Make Ready: Load your firearm while facing away, eyes covered.
- Scenario Start: Partner calls the range hot and starts the timer or countdown.
- Assessment: On the beep, assess the target using the following PID rules:
- Canary: Clearly non-hostile or partisan. Do not engage.
- Parrot: Ambiguous or uncooperative. Issue commands first.
- Crow: Armed or threatening. Engage with justified force.
- After Action:
Make your case to the observer. If your shoot was justified, the scenario ends in success. If not, it's your partner’s turn.
Final Thoughts
This drill index for tactical shooting is designed to help you build fundamentals, train under pressure, and make split-second decisions. Tailor your training to your skill level, set time-based goals, and always prioritize safe gun handling.
Optimize your sessions by tracking progress and incorporating dry fire days. Whether you’re preparing for real-world encounters, competitive shooting, or just improving performance, consistent and structured training is key.
Be sure to shop Medusa Targets, and follow us on Instagram!